


Cute Graveyard - Assignment 3
- AlmsAni

- May 8, 2021
- 9 min read
Updated: May 11, 2021
For the final assignment of this module, we were tasked to from groups and create a 15-30 3D animation based on the word "adventure". Once we had formed groups, my group and I had a call where we brainstormed project ideas. The main 3 ideas involved 2 of mine:
Museum curator in a haunted art gallery at night
Scary graveyard with a contrastingly cute main character/creature
After another meeting, it was decided that the latter idea is what we'd create. Following discussion to see who wanted to do what, I chose to be the character modeller - and we all agreed we'd share the animation work.
Pre-Production:
Firstly, we all gathered inspirations together in the form of moodboards and references. Since the location of our animation would be a graveyard and we were aiming for a more cartoony style, I provided references from the PS1 and PS4 versions of MediEvil:


The main inspiration we decided on when it came to the Wisp was this image:

The main goal was to create a pudgy, cutesy fire character that would be simple to model, but appealing wth its minimalism. We bounced around ideas, like the Wisp's legs being little logs of A campfire. When creating design concepts, I focused on playing with shape and varying proportions:


The concepts below are Nathan's - with the one second image being what fuelled the final design for the Wisp:


The next call of action was to develop a storyboard, which Nathan ended up putting together:


I volunteered to then take the storyboards, and form an animatic - taking the lecturers' advice into consideration concerning the location of the scary tombstone, and what happens after the Wisp runs off. Firstly, I took the storyboards and put them in video form:
Following this, I redrew the frames, then began creating additional ones. I added scenes from where the storyboards ended, showing the Wisp running away from the scary tombstone in fright, then returning to his candle for safety. Dan provided me with some sound effects, and I also gathered my own. The music I chose for the scene is "Gallowmere Waltz" from MediEvil Resurrection - and yes I am obsessed with the franchise. I edited the music so the crescendo would happen when the scary tombstone is revealed by lightning, and the calmer portions would ocurr when the Wisp is returning to his candlestick. As the song concludes on soft, quiet notes, the Wisp falls asleep in time with it. Overall, I absolutely love the animatic I produced, and think it displays a simple, yet appealing narrative.
Modelling:
My tasks going forward were to model the Wisp and its candlestick. I began with the wisp since it seemed easier. As my laptop and Maya were giving mme trouble, I chose to model in Blender. I started off with a UV sphere, to which I used Boolean on to half it. I then added a cone mesh, and joined that to the sphere. This proved to be a problem, as after several tries to line up the two meshes correctly, I kept running into the same issue where the cone was slightly off, which ruined the symmetry. I also forgot to remove the bottom face of the cone several times, so it lead to said face poking through the hemisphere. Other problems ocurred when I was using the Multi-Cut tool. The goal was so I would be able to scale up different parts of the body to create the exaggerated teardrop shape we were after. Using this tool on the cone mesh created jagged cuts, instead of a straight one. This created unnecessary issues when selecting vertices, and ended up leaving me unable to smooth the mesh efficiently. When sculpting to attempt to smooth it, the cone's faces would always show through no matter what. I used a Subsurface modifier to counteract this to the best of my ability. We were advised by lecturers to scrap the legs entirely, so it left me with only the arms and eyes left to add.


I was advised by my lecturers to redo the model, but start with a UV sphere - this would prevent the smoothing issue. I went and remodelled the body of the wisp with this in mind, and unsurprisingly enough, the process was much easier.
Next was to texture the Wisp. I simply went in with a matte plastic texture in a cyan shade, and began painting the body. The eyes were the same material - just in black. I added white detailing to match the initial design, then attempted to add glow effects. This proved impossible despite me following the tutorials I had been watching step for step, so I decided to leave that part for Dan to doalong with the rigging he had said he would do.

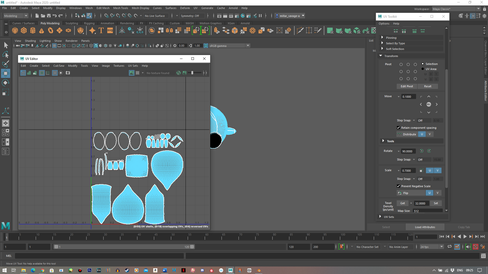


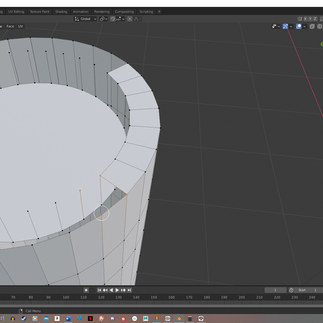
The candlestick took a couple of attempts to model. The actual holder of the candle was easy to model, which I did so in Maya: just a flattened torus for the rim, a booleaned cylinder for the main portion, and another flattened torus for the bottom - with another torus for the handle. I used the multi-cut tool to cinch in the middle of the main portion of the holder, then selected the outer ring vertices of the rim torus so to droop it down slightly. The next portion to model was the candle itself, so rendered the holder as an FBX and imported it into Blender - since I find the sculpting tools easier to grasp there. I used a standard cylinder mesh and scaled it to be taller. I used the multi-cut tool to cinch/expand different areas to create an asymmetrical effect. I then used it on the top face to cut out a circle, so to move it down in an attempt to create the dip in the candle. This was an unnecessarily complicated way of doing suuch a task, and again - like with the Wisp - it lead to me being unable to smooth the model in sculpt mode. I started with a fresh cylinder and did the same cinching/expanding process, (this time with the proportional editing tool) before taking it straight into sculpt mode. Using the inflate brush, I was able to create realistic wax drips and dips. All that was left to model after this was the wick at the top, which was just another cylinder warped with the proportional editing tool, and obviously scaled down.


When texturing, I obviously wanted a wax texture for the candle itself. Being the idiot I am, I only searched in the Materials tab for such a texture instead of the whole software.. This lead me to install one from an online library. For the metallic elements, I used Iron Raw Damaged, so to give the handle a weathered appearance. For the wick, I simply used the Linen material in an umber colour.
My lecturers thankfully pointed out the built-in wax texture to me, so I would be able to retexture with more desirable results. The final textures came out great! But unfortunately, after dozens of tutorials as before, I was unable to apply all the textures - so these were sent to the group Discord so hopefully someone could apply them for me.


Animation:
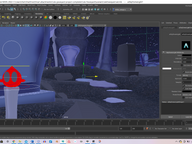
Eventually, the rest of my team got their assets and assembled the scene, so we could finally begin animating. I had already split the animatic into 8 shots, so it would be easy for us to choose what each of us was to animate - two shots each. I chose shots 6 and 8 to animate myself. Once I opened the scene, I created a camera and positioned it so to match shot 8, then posititioned a tombstone behind the Wisp and candlestick for the same reason. I then began blocking out the keyframes; it was really fun using the different rigs to bend different parts of the Wisp in different directions - although I ran into bother with the eye rigs as it wasn't made clear to me that there was two separate ones, (one for movement, and one for eye shapes) plus I had to change the positioning of the eyes using the Channels and not the move tool - as this reset the position of the wisp body completely. I used squahs and stretch heavily, so to give the Wisp a bubbly personality, and used the Scared eye shape to show the fright it got from seeing the scary tombstone. Its movement when dashing over to its candle was very similar to that of a bouncing ball, which was a helpful guide to keep in mind. Once the Wisp was positioned on the candle, I used the middle rig to move right to left every few frames in order to give the appearance of swaying fire. I used the closed eye shape to animate the Wisp drifting asleep in sync with the music, also making the fire swaying "jitter" quicker as the Wisp woke up intermittently before falling asleep. The file would crash anytime I tried rendering through camera 2, so I had to make the perspective match that of said camera as close as I could - though it still kept crashing before rendering the first frame. Once I changed my setting from rendering using the GPU, to rendering using the CPU, that seemed to fix it. I rendered the 210 frames as EXR, and this process took over 12 hours.


Next, I took all the frames and imported them into After Effects in an image sequence, before using Adobe Media Encoder to export as a MP4 file - one shot complete.


For shot 6, I firstly made the mistake of using the wrong tombstone, as I only needed to animate a plain tombstone, then swap it out with the scary one for one separate frame. Regardless, I created a new camera, and positioned it in the correct angles at keyframes 0, 24, and 48. I used this timing to use some trickery on the tombstone's movement. I rotated it back and scaled it taller for the beginning, so to give the illusion of an extreme perspective that would mimic the one from the animatic. As the camera zoomed in, the tombstone would get taller and move upwards, so it gave the illusion that it was taller, as it was taking the camera a while to pan up to the top - also adding build up to the reveal of the scary face, and highlighting how tall the tombstone was compared to the Wisp. As the camera reached the top, the tombstone returned to its original proportions, but remained leviatated in the air off camera, again so it would appear taller. This shot was only 64 frames + the singular frame of the scary tombstone - so the rendering process, (this time i chose to render in jpg fromat) was much quicker, only taking around an hour. I repeated the After Effects process with the first 64 frames too.


It was then my job to take all the shots and edit them together, along with adding sound design so to create the finished video. I imported my shots into After Effects, along with the animatic so I would have the same sound effects/music already sorted. I organised my shots to match the timing of the animatic, then awaited the others' to finish and upload their shots. Dan gave his in first, however this created consistency issues due to him turning the glow of the Wisp off for his shots. Timmy submitted his in next, though it was missing 20-30 frames, and thus was hard to salvage. Nathan's computer was taking ages to render his, so he sent the frames to me so to import into After Effects in order to render as an MP4. After all this, I was able to edit the whole video together. Timing was a big issue, as many of the shots didn't match the timing of the animatic. Additionally, I added some lightning flash stock footage before the frame of the scary tombstone, in sync with the crescendo of the music. I rendered the full thing, then that was that!

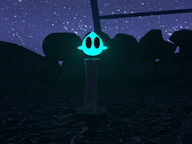
The final animation:
Conclusion:
Overall, I'm super proud of the work I contributed to the group. I wish I had got the chance to do more character design work, but I'm really proud of myself for persevering through all the hurdles and challenges that this projects threw at me. I'm particularly thrilled with shot 8 as I believe I used the rigs effectively, and my use of squash and stretch gave the Wisp character. The way I utilised the rigs also created the effect I wanted, which was to have the Wisp sway like fire. I'm happy I kept on top of things, and believe I'll do 3D work for personal projects in the future perhaps.
Reflection:
This module allowed me to really push myself with my 3D animation capabilities - and I was able to develop a liking towards creating works in the medium. Obviously, not being on campus made it really challenging to stay motivated, or get fully engrossed in work, but the year flew by regardless and I had fun. Groupwark was the most challenging aspect this year as unfortuntately the groups I've been in lacked organisation and focus, and left me really stressed out. Though I am thankful to have gained a better insight to the inner workings of animation teams. I look forward to experiencing campus life, and developing my 2D animation skills in particular.

Comments