

Sword and Shield
- AlmsAni

- Mar 8, 2021
- 7 min read
Updated: Mar 11, 2021
For this assignment, I chose to go with the sword and shield option. The thought process behind this decision was.... brief... to say the least. I immediately was drawn to it due to the inspirations, (seen in the next section). I knew I wanted to do a shield inspired by the style of the PS1 game, MediEvil. When thinking on a neat twist I could put on the concept of a standard shield, I remembered my obssession over foxes. My mind immediately went to the Japanese mythological creatures, known as kitsunes. The way they're depicted in Japanese art and masks is very appealing to me, so I decided to use kitsunes as my main theme.
Inspiration/research:
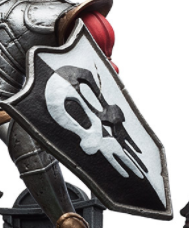


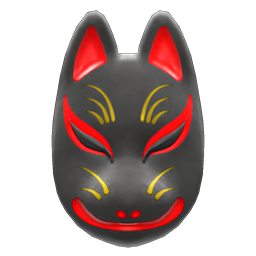


Researching came very easy, as I knew exactly what I was after. Firsty, I searched for the shields from MediEvil. I gathered some official imagery of it, and whilst doing so: stumbled upon some 3D renders made by online artists. This was extremely helpful, as it gave me somewhat of a reference as to what I would want my own shield to be shaped like. When researcing kitsune masks afterwards, it became apparent just how well their shape matched with the general shield shape. I took particular note of their colour palettes, and the face markings in particular. I also looked at the game series, Animal Crossing, for reference - as I remembered there was a kitsune mask item in the game, along with the character, Crazy/Jolly Redd, (assumed to be a kitsune - or at least inspired by them heavily). Looking at the models for both helped greatly; Redd's funky ears provided great inspiration for how to design the ears of the shield.
Planning:
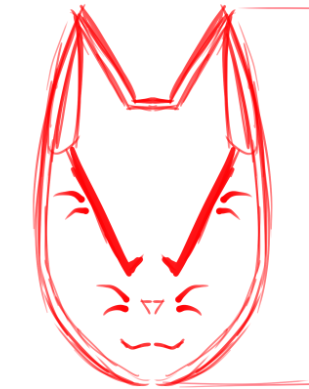
I decided to tackle designing the shield first. I jotted down basic shield shapes at first to get a grip on what I could play around with. A few sketches in and I started coming up with more robust concepts. When I came up with one I found pretty solid, I played around with slight changes here and there.
Following this choice, I developed the sketch I would use as my reference image when modelling:


Next up, I repeated this process with the sword. I hadn't had an immediate foggy idea of what I wished to create, unlike the shield. I played around with having the sword resemble kitsune paws - but soon came to realise that this would be far too challenging for me, (aka: beginner). When considering other fox/kitsune features, I soon found myself banging my head, as I hadn't yet considered perhaps one of the key features: the tail. Kitsune specifically are nine-tailed creatures so... didn't want to model 9 seperate tails, nor did I have a notion on how to incorporate them. I ended up deciding on modelling the blade after just a lone tail. As you can see in the initial sketches: I had varied ideas on how to execute this. Thankfully, my boyfriend, (avid history nerd) suggested I did a curved sword. This was ingenious, as it would allow me to better incorporate the kitsune tail element into the design. Upon research, I chose to loosely base my sword on a "scimitar", and Central Asian swords in general. After a quick sketch, I drew out the reference image I would use:


Process:
I started by modelling the shield first. I started with a cube, decreased the depth, then began adding edges with the Multi-cut Tool. By selecting certain edges, I was able to mould the flattened cube to fit the reference image I used. I ran into issues with attempting to cut out the area for the ears. I discovered that I needed to use the Boolean tool, however, when I attempted to use it, I received an error saying that I hadn't enough polygons selected. After hours of researching and pulling my hair out, I accidentally ended up finding a work-around. I say accidentally, as I don't remember how I got it to work. In hindsight, the next steps were really inefficient. I took another cube, decreased its depth, and then cut out the eye shape using the Multi-cut Tool. I now know there's easier ways around it...
After this I modelled the nose in a similar fashion, and used the Extrude Tool to create the would-be metal border. I took what I had modelled on the left side, and mirrored it before combining the two sides. This created a tad bit of overlap that I wouldn't notice for a while.
All I had left to model for the shield was the handle. Sounded straight-foward: create a torus, format it, Boolean off half, then combine! Nah - Maya was having none of that. The same error kept showing up about needing 2 polygons selected. I couldn't remember how I fixed that same issue from earlier so I spent at least a day trying to search up a solution. I was about to give up on making a handle entirely before I discovered my models weren't polygons and were instead NURBS - thank you, that miracle of a web forum. I quickly found out how to convert the NURBS to polygons, sighed hard, then carried out the original plan. Finally done modelling the shield, after that.
UV mapping was a complete nightmare. I opened the UV editor to find utter chaos - so deleted the UVs and had to start fresh. This meant hours of painstakingly selecting each face for each different feature of the model - everything from the front, to the dozens and dozens of bevelled edges. Eventually, it worked out. Lost a bit of my sanity though.


Texturing was by far the most relaxing bit - thankfully. I imported the shield model into Substance Painter, and selected the textures/colours I was going to use based on the kitsune masks. I particularly liked the black masks, as the reds and golds looked really striking against it. Using the Pure Gold texture, I filled in the border around the front. I also used this texture on the nose, the handle on the back and all but the top faces of the eyes. For the inside of
the ears, and for the top parts of the eyes, I used the Painted Steel texture - obviously, the inner ears being a lighter shade of red. Finally, I used the Rough Wood texture, (in a warmer shade of brown) for the wooden portions. As for detailing, I used Painted Steel in the same shade as the eyes, to use for the face markings and the mouth. I used Pure Gold to add a slight border around the back and "screws". I then rendered the textures, before applying them to te model itself in Maya.


Next: I began work on the sword. This process was infinitely smoother now that I had figured out my problem areas. I started with a cube again - flattened it, then used the Multi-cut Tool to cut out the sword shape I wanted. I deleted the faces I no longer needed, before using Extrude to add thickness to the shape I cut out. Following this, I used Bevel to provide bevelled edges. Next, I created a cyclinder - to which I used the Multi-cut tool on to create more edges. I altered these edges so to form the detail in the handle. Then I created a disc; varied its depth and scaled it down before rotating it to be the top of the handle. To complete the handle off, I created a torus and turned down its radius. I then duplicated it, and transformed the duplicate to be just above the original - this was repeated once or twice more until I had 8. I combined the lot, scaled the piece down, and positioned it to be just under the top of the handle. Finally, using Multi-cut, I cut out what I call the "tail tip", (aka: the different coloured fur on the tip of a kitsune/fox's tail) before extruding it by 0.02. The sword was done - and hassle free!


After importing the FBX model into Substance Painter, I figured it was only wise to use the same palette/textures as with the shield. I used Pure Gold on the metallic portion of the handle, and for detailing, (that mimics the kitsune mask markings) on the top of the handle. I used Steel Rust in a similar deep grey for the blade itsellf, and a darker grey again for the handle itself. I then used crimson shade for the top and bottom faces of the handle - along with the "tail tip", (definitely not coincidental that it happens to look like blood oops). For some reason, the UV island for said "tail tip" didn't show up, and the island for the main portion of the handle moved down, so I had to work around it by manually colouring around the outline of the "tail tip" before filling it in.
UV mapping was equally as easy - kinda. The automatic map that was generated was pretty good already, but when I tried scaling the UV shells - particularly all the torus that were layed on top of each other - nothing would scale. I didn't find out what was happening, but I was able to manually scale by typing different values in the Scale section of the toolkit.


I exported the textures as normal, and repeated the application process as I did for the shield. I had to move the "fur tip" around to over a red area on the texture, to account for that UV island not showing up in Substance Painter to begin with. I also moved the handle's island over to the dark grey area, as for some reason it had moved on the UV map when texturing.
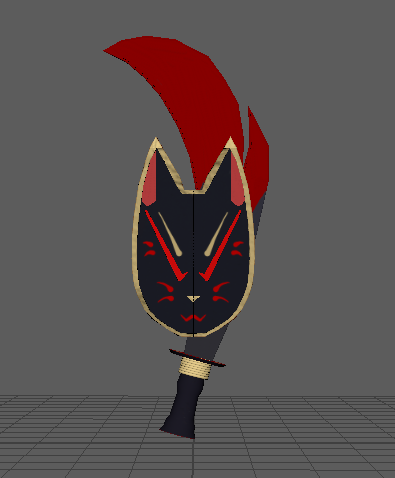
Finally, I exported the now textured models as FBX files, before importing both into a new scene. I sized up the shield, then positioned both models to look neat beside each other. After combining and exporting the positioned models, I created a zip file with it, alongside all the appropriate textures. This was then uploaded to Sketchfab, where said textures were applied before publishing.


Conclusion:
Overall, I’m very pleased with the end results. The shield was admittedly the harder one to model; I rushed in and wasn’t very streamlined with how I went about things – thus resulting in me confusing myself greatly. Even once I got my bearings, the convoluted way I had started things, made it even more frustrating and difficult. UV Mapping was perhaps the thing I found the trickiest, along with the difficulties I ran in with the Boolean/Combine Tools. The sword was far easier to model, in comparison… thankfully. Texturing was a nice break between all the chaos, as was applying the textures back in Maya. Even just the comparison between modelling the two items, shows how different just a few weeks makes to one’s skill. This assignment certainly was the most challenging artistic task I’ve done yet – as up until this year I’d only dabbled briefly in 3D about 4 years ago. This module has been a steep learning curve, but finally taking it on has only benefitted me. To summarise, a part of me may be dead inside, but at least I made a cool shield and sword.
Videos I used as guides throughout:
Research:


Comments